/
Silent Windows Client Install with PowerShell
Silent Windows Client Install with PowerShell
- Former user (Deleted)
Owned by Former user (Deleted)
Jul 25, 2016
When deploying within an existing network, you'll need to be able to push the client software to each computer you want to protect with UrBackup. If your existing servers are not managed (for example with System Center Configuration Manager, PDQ Deploy or other software management tools) you might decide to use a script to push the client to each computer.
Step-by-step guide
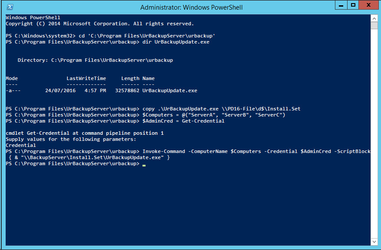
- Log onto your UrBackup server with an appropriately privileged user. You might choose to be a domain administrator for this type of task.
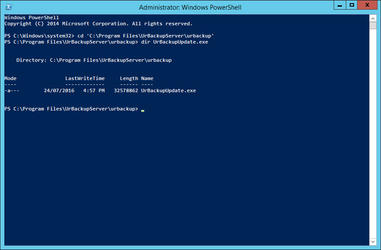
- Locate UrBackupUpdate.exe in the UrBackupServer directory - this is the update client, but will also perform a new installation if required:
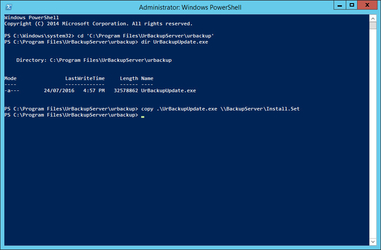
- Copy UrBackupUpdate.exe to a share from which you can run the installer. For the purpose of this HowTo, I'll assume the server and share is \\BackupServer\Install.Set:
 s
s - Define the list of computers on which you want the client to be installed:
$Computers = @( "ServerA", "ServerB", "ServerC")
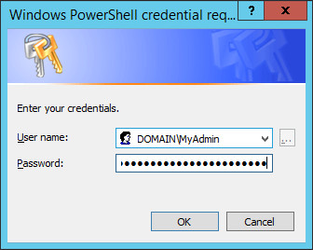
- Define your administrative credentials for the remote computers (this is not validated during entry so you can use any username and password which will be valid on your computer list):
$AdminCred = Get-Credential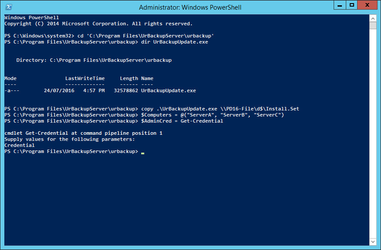
- Use PowerShell's "Invoke-Command" to run the UrBackupUpdate.exe installer on each computer:
Invoke-Command -ComputerName $Computers -Credential $AdminCred -ScriptBlock { & "\\BackupServer\Install.Set\UrBackupUpdate.exe" }
PowerShell Script Block
$UrBackupPath = "C:\Program Files\UrBackupServer"
$InstallSource = "\\BackupServer\Install.Set"
$Computers = @("", "", "")$AdminCred = Get-Credential
$ClientSource = $UrBackupPath+"\urbackup\UrBackupUpdate.exe"
copy $ClientSource $InstallSource
Invoke-Command -ComputerName $Computers -Credential $AdminCred -ScriptBlock { & "$($InstallSource)\UrBackupUpdate.exe" }Related articles
, multiple selections available,
Related content
Copy of Download custom client installer via Python
Copy of Download custom client installer via Python
More like this
Headless Linux client setup
Headless Linux client setup
More like this
How to build the restore cd
How to build the restore cd
More like this
How to restore via command line
How to restore via command line
More like this
Install UrBackup Server on a VM/Ubuntu 14.04
Install UrBackup Server on a VM/Ubuntu 14.04
More like this
Assemble zero-copy disk image on Linux
Assemble zero-copy disk image on Linux
More like this